M-EQ Cheatsheet: 9 Important Tips
There are two kinds of EQ sessions: the ones where you steer the sound, and the ones where you negotiate with it. M-EQ is built to end the negotiation.
It looks simple with three bands, but it behaves with spectral-resolution precision under the hood. That means your job is not to babysit dozens of nodes. Your job is to frame intent, commit, and move on.
Here are nine tips that will upgrade both your mixes and your pace.
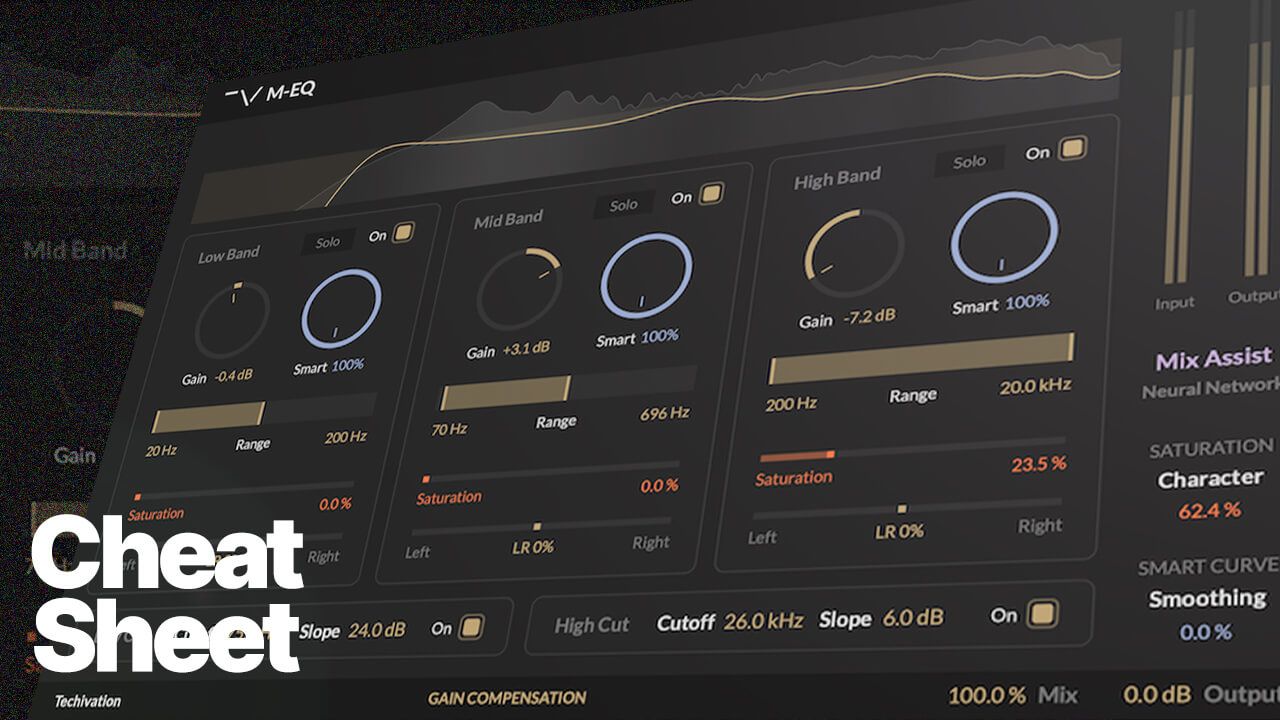
Tip 1) Start with Mix Assist, but treat it like a first draft
When you’re moving fast, the hardest part isn’t EQ. It’s deciding where to begin. Mix Assist (Neural Network) is a legitimate time-saver for that first pass, especially on full mixes, vocals, or instruments where you know the direction but not the exact move.
Use it like this:
- Trigger Mix Assist and let it propose a curve.
- Immediately do the engineer’s move: tighten the Range where needed and reduce anything that feels like “too much opinion.”Commit to the rest of the workflow: Range → Gain → Smart → Saturation → A/B.
It’s not autopilot. It’s the shortest path to good enough to refine.
Tip 2) Your real control is Range. Treat it like a safety rail.
In a classic EQ, the centre frequency is your first decision. In M-EQ, Range is the first decision because it controls footprint, meaning how much of the spectrum you’re allowed to touch.
A range that’s too wide turns every move into collateral damage. A range that’s framed correctly makes the next gain move feel like it has one job.
Quick check:
- If you adjust Gain and the whole track’s personality shifts, your Range is too wide.
- If the move feels overly pinpoint or “peaky,” widen slightly.
Range-first is how you get surgical results without a surgical UI.
Tip 3) Use Band Solo as a diagnostic tool, not a mixing crutch
Band Solo is for answering one question: “Is this the region I think it is?”
Use it to:
- Confirm that your selected band is actually containing the problem (mud, bite, fizz).
- Verify that the Range boundaries make musical sense.
- Identify whether the issue is constant or event-based (which tells you whether Smart should do work).
Then turn it off. If you mix while soloed, you’ll overfit the band and undercut the whole.
Tip 4) The danger-zone boost trick: Mid boosts become safer when Smart is used as a limiter
Midrange boosts are where engineers get punished. +2 dB can be magic. +4 dB can be glare. The reason is never “mids are bad.” It’s that a broad static boost lifts the wrong neighbours.
With M-EQ, do this instead:
- Frame the Range tightly around the musical goal (presence vs nasal vs bite).
- Keep the boost modest.
- Add Smart as a restraint so the boost doesn’t behave like a blanket lift when the signal gets dense or harsh.
This is where M-EQ’s spectral-resolution behaviour matters. The engine keeps the lift focused on what’s actually present instead of inflating everything nearby.
Tip 5) Control motion with Smart Curve Smoothing (your stability knob)
Smart is powerful, but if it moves too much, you’ll hear it. Not as distortion, but as tone that won’t sit still. That’s what Smart Curve Smoothing is for.
Use it when:
- Smart feels too animated on sustained material.
- The correction is right, but the movement is distracting.
- You’re mastering and want stability more than activity.
Conceptually, Smart decides what to correct. Smoothing decides how calmly it behaves.
Tip 6) Use Saturation for density before you reach for more gain
A lot of EQ boosting is really a request for density: forward, present, more finished. The trap is that EQ can get sharp before it gets exciting. M-EQ gives you a better axis:
- Gain changes balance.
- Saturation changes harmonic density.
Workflow that works:
- Get the tone right with Range + Gain.
- If it still feels thin, add Saturation inside the right band range.
- Keep the gain conservative and let harmonics do the heavy lifting.
This is especially effective on presence and air, where conventional boosts turn brittle fast.
Tip 7) Set Saturation Quality based on context (and stop wasting CPU)
M-EQ’s Saturation Quality (Standard 1× / Good 2× / Great 4× / Ultra 8×) exists for a reason. Nonlinear processing creates high-frequency byproducts, and higher quality keeps that cleaner.
Practical rule:
- Tracking / sound design: 2× is usually the sweet spot.
- Mixing: 2×–4× depending on session size.
- Mastering / final print: 4×–8× when committing, especially if saturation is audible.
Don’t run Ultra everywhere just because it exists. Put quality where the harmonics matter most.
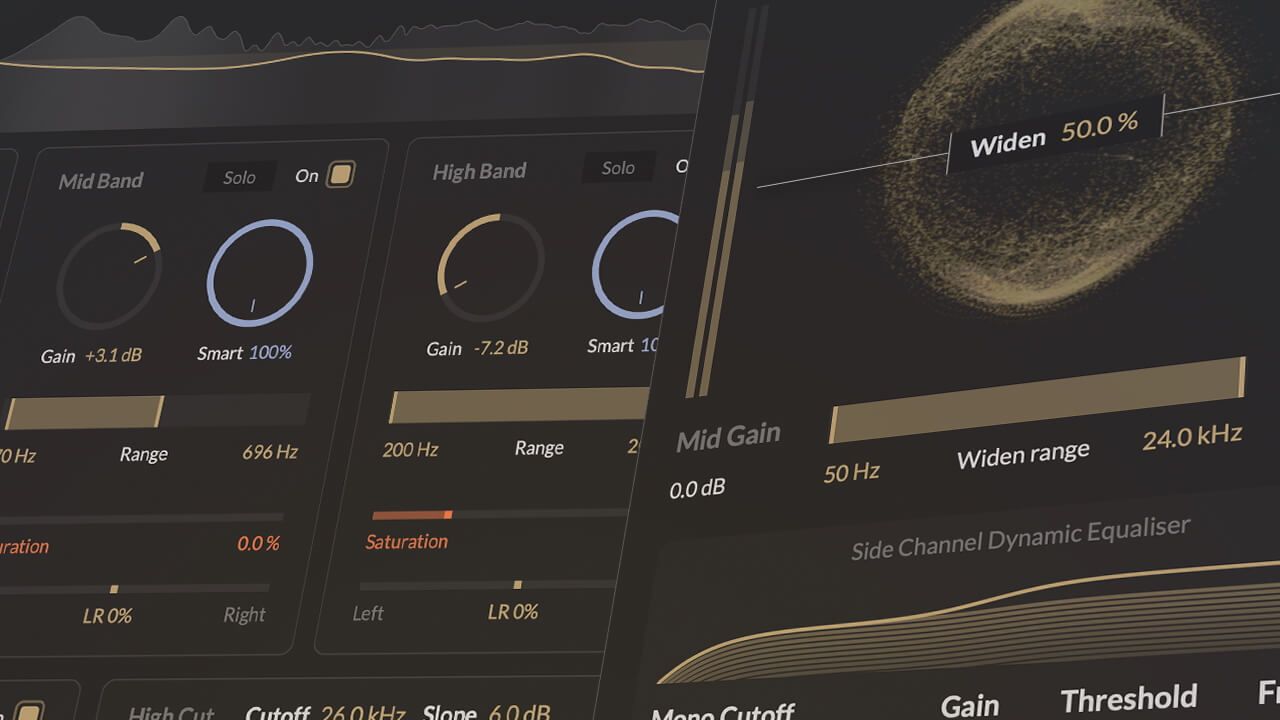
Tip 8) Use Mid/Side plus Band Stereo Balance to solve width problems surgically
If you’ve ever tried to fix width with a broad stereo EQ and ended up destabilising the centre, you know the pain.
M-EQ gives you two powerful levers:
- Mid/Side mode for centre vs sides intent.
- Band Stereo Balance per band to control how strongly a band affects left vs right.
Use cases:
- Tighten low end in the Mid while leaving Side ambience intact.
- Add air to Sides without bleaching the vocal in the Mid.
- Reduce harshness on wide guitars without dulling the centre.
This isn’t “make it wider.” It’s placing the energy where it belongs.
Tip 9) Always do the last 10%: Gain Compensation + Mix
Human ears lie when level changes. That’s why Gain Compensation matters. It keeps your A/B honest when you’ve changed tonality and density.
Final workflow:
- Toggle Gain Compensation ON.
- A/B your move.
- Use Mix as the final control for taste: 100% for correction, 60–90% for vibe, and lower when you want the original to breathe through.
This is how you keep the benefits without overcommitting.
Try M-EQ Now!
Share this Article
Featured in this post
![M-EQ Review By Czar [Video]](https://cdn.sanity.io/images/9uzzx98j/production/341fd252af5cfdce3815b27290e6ccf6b1185b98-1280x720.jpg)